
TAIL TWISTING
As requested by Inka, each rat must have a squiggly, wiggly tail in snazzy colors.

To accomplish that, I start by wrapping the yarn around a board that is just the right width, then I cut the yarn at both ends.


For each tail I use two strands of yarn in different colors.


When I bring the two loose ends together, the pieces "re-wind" around each other into a pretty twist, and I secure it with a knot.
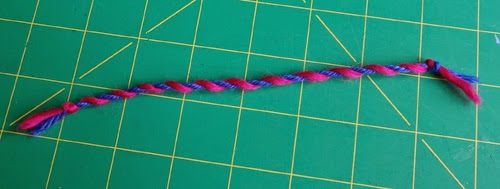
Okay, one down, about 200 more to go. :-)

There, now that's better. With help from the very patient man who lives here, we'll have our tails in a twist in no time!

LAMINATION ELATION
I'm not a big fan of plastics, so I don't know what it is about sending a piece of paper through a lamination machine, and having it come out the other end perfectly preserved and impervious to the elements, but I confess-- I LOVE it! In an unselfish act of motherly love, I decided to let my son and studio assistant Christopher share in the joy. He spent last weekend making up the first batch of generic I.D cards for the project.


A COUPLE OF CUT-UPS
 As many of my long-time readers know, Buttonwillow has an intense fascination with scissors and continues to try to master the art of using them.

So Buttonwillow and I put our scissors to work and cranked out these puppies in no time at all.

SOME ASSEMBLY REQUIRED
Time to put my sewing machine to work. I love listening to TED talks and to Jango radio on my computer when I sew. Just look at this happy pile o' grinning rats!
Turning these babies inside-out and stuffing them are two more fun tasks that I am sharing with Chris, and he's doing a great job!

Funny story about the catnip. I've been making different catnip toys for several years now and I store these bags of 'nip in our garage where it is dark and cool. We moved into our new house about 18 months ago and soon had our first garage sale-- in the garage-- and met many of our new neighbors. About halfway through the sale, I noticed that my four large polybags of dried green herbs were prominently lined up on a back shelf in full view. I wonder just what might have been going through the minds of those neighbors, but no one had said a word. Just to be safe, during the rest of the sale I hid the bags inside the house, lest there be any confusion about just what kind of herbs were in those bags....
Next pre-production task: Packaging. I'll show you what I've come up with in the next post.
Thanks again for all of your support and enthusiasm as this project progresses! There is still time to procure your own Snazzy Rats by making a pledge at this link. The campaign ends Tuesday, April 23.
No comments:
Post a Comment